- Docs
- /
Powershell – Getting started
08 Feb 2022 16260 views 0 minutes to read Contributors ![]()
![]()
What is PowerShell and Why is it Useful?
PowerShell is a command-line interface for Windows computers. A command-line interface (CLI) is a program for telling your computer to do tasks using typed commands, rather than by clicking pictures on the desktop as in a graphical user interface (GUI). Using the command line has many advantages. It makes it possible to automate tasks and to do many things with one command. Most importantly, a number of tools of value to humanists can only be run from the command line. The command line is also the best place to work with programs you have custom built for your own research using programming languages like Python.
Getting Started
Open Powershell
So first how can we access or start powershell on our systems, there are various powershell tools available.
- Windows Powershell : It is based on the .NET stand work. So uses the full .NET Framework that's built inside of windows. It's also built into windows, so when you get a copy of Windows, it has windows PowerShell ready for you to go. One of the downsides that we're finding is that Windows PowerShell is only on Windows. You can't install it on a Mac. You can't run it on Linux. While you can use Windows PowerShell to work with some of those systems, it's only going to run on a Windows system.
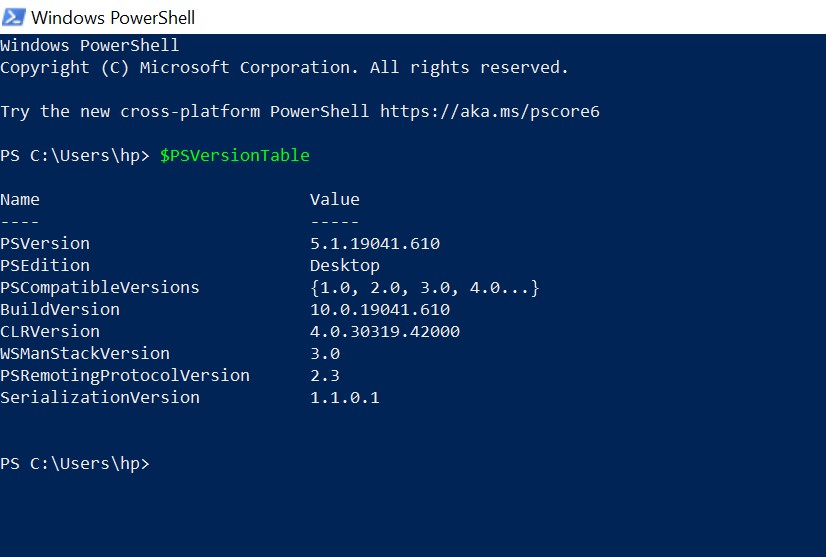
2. Windows Powershell ISE : It is similar to Windows Powershell in every way just it provides an interactive GUI with lots of easy to use functionalities.
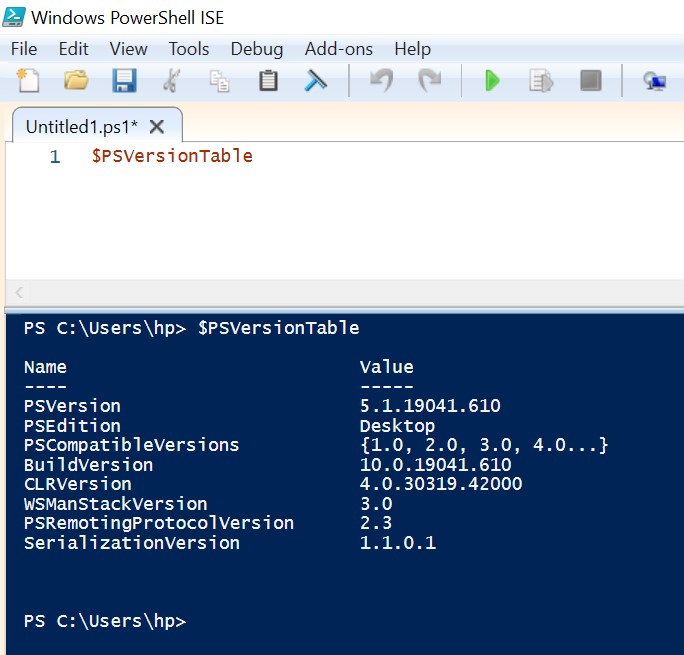
3. Powershell core : PowerShell Core is based on .NET Core, which is a smaller, lightweight version of .NET that's designed to run across platform. So it's downloadable from GitHub, and the beauty of it is that it runs on Windows, Linux and macOS. So PowerShell core is really the future of working with PowerShell because it allows you to use PowerShell on any platform that you're looking at. It's also open source. It's an open source project that is available for you to work with on GitHub.
Navigation
In powershell on its prompt it always shows your current folder you are in, still we can check using command Get-Location

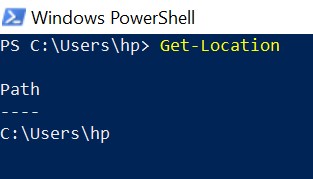
And, if by any chance you want to go user folder from any location you are in currently, use below cmdlet
sl ~
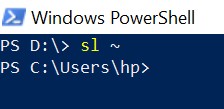
Here we were in D: drive and after executing the command-let we directly went to our user folder.
After we are aware of our current location we should know how to look directory and files we needed.
Viewing Directory Contents with Get-ChildItem (gci, ls)
This command will show us all items in a folder/directory
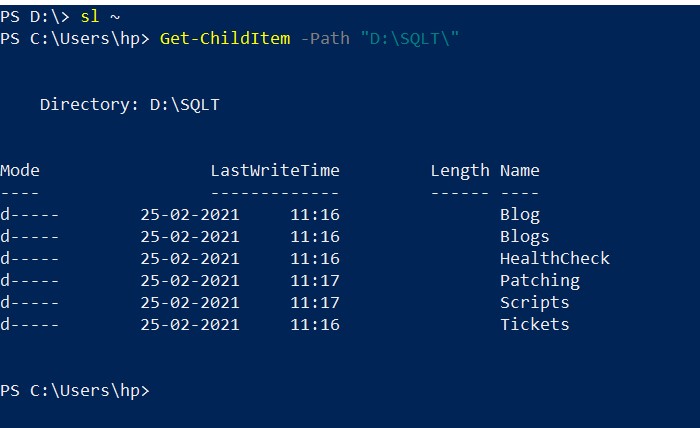
The commands we will be learning are all of the form Verb-Noun. These are called “cmdlets” (pronounced “commandlets”), and their form is supposed to make it easy to remember what they do and predict similar cmdlets. Because cmdlets are rather long, most of them come with sleeker aliases that you can use instead.
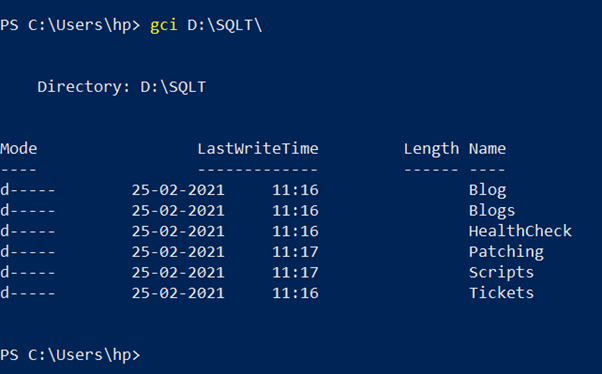
Notice that I didn’t actually enter Get-ChildItem. I just entered gci. It is important to note that many cmdlets have multiple aliases. For instance, Get-ChildItem, gci, dir, and ls all do exactly the same thing. While it is unsurprising that gci is short for Get-ChildItem, you may be wondering where dir and ls come from.
PowerShell is relatively new (first released in 2006), and its designers anticipated that many people who would use it would already have experience with some existing CLIs (command-line interfaces), specifically either with Microsoft’s older CLI called command prompt, or with Linux CLIs like Bash, which is now also standard on OS X. Thus, many cmdlets have an alias that is the standard command in one of these two systems (and often for both). In the present example, dir comes from command prompt, and ls comes from Bash.
Moving Between Directories with Set-Location (sl, cd)
To move to your desktop, we’ll use the Set-Location cmdlet. Enter
Set-Location Desktop
sl desktop
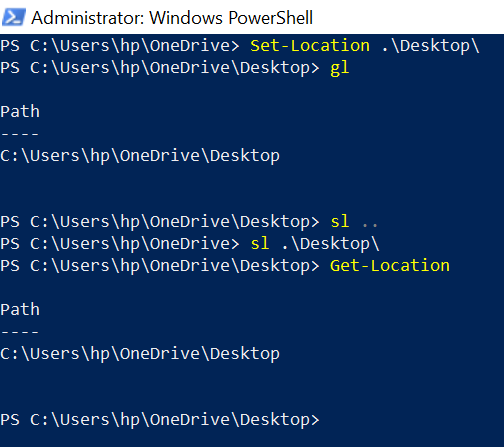
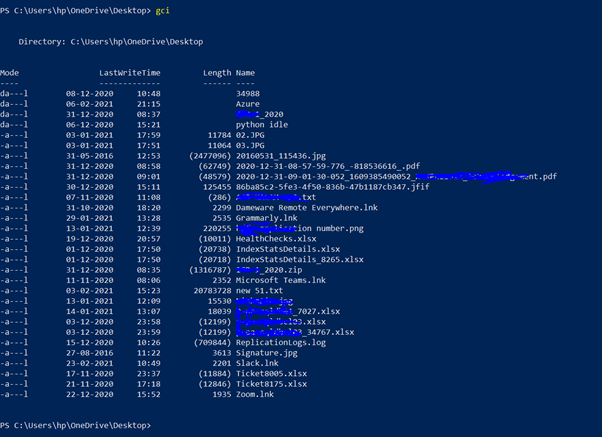
This tells PowerShell to move to the desktop. PowerShell is not case sensitive! Now that you’ve changed your location, you can use gci to see a list of everything on your desktop - that is, everything in the directory named Desktop. If you’re as disorganized as I am, this will be a long list. We can move back to the YOURUSERNAME directory by typing
sl ..
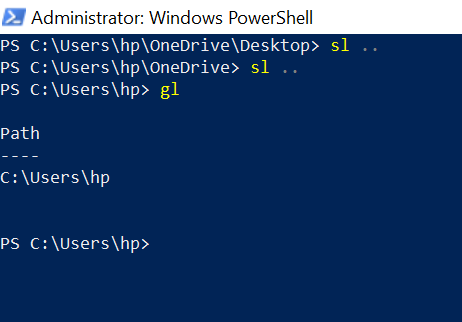
. You should be in the Users directory.
You can get back to where you started with one command, i.e, \ all the time, you can also type sl ../... Not only is PowerShell not case sensitive, it also doesn’t care what direction the slash goes. sl ../.., SL ..\.., Set-Location ..\.., and set-location ../.. all do exactly the same thing.
Creating New Directories with mkdir
We’re moving toward working with files. Before we start, let’s make a directory where we can store everything we’re using for this lesson. Navigate back home by typing
sl ~
We’ll make a new directory inside of your YOURUSERNAME directory. To do this, we use the command mkdir. Call your directory whatever you want, but try not to use spaces, as these make working on the command line more complicated than necessary. I will call my directory “PowerShellDemo”. So I type
mkdir PowerShellDemo
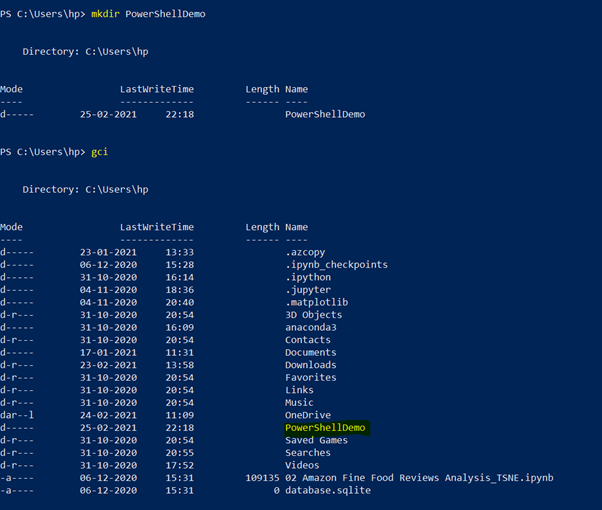
sl PowerShellDemo
Enter
gci
and you’ll see that there’s nothing here. That’s because you haven’t put anything in it! Let’s put a new directory inside with mkdir. We’ll call this directory “Directory with a long name and lots of spaces”. Because the name has spaces in it, we’ll have to use quotes to create it. Type
mkdir "Directory with a long name and
lots of spaces"
and hit enter. Now enter
gci
and you’ll see your new directory. Suppose we want to move into this directory. We would have to type sl "Directory with a long name
and lots of spaces". Not only will this take a while to type, but if we get one letter wrong, PowerShell won’t be able to find our directory. Instead, try just typing
sl d and then hitting the tab key.
Using Push-Location (pushd) and Pop-Location (popd)
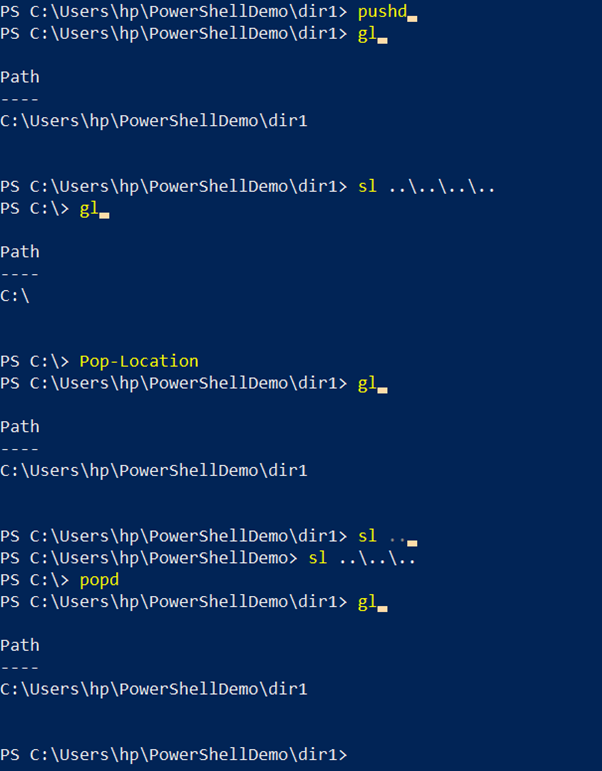
The Push-Location cmdlet adds ("pushes") the current location onto a location stack. If you specify a path, Push-Location pushes the current location onto a location stack and then changes the current location to the location specified by the path. You can use the Pop-Location cmdlet to get locations from the location stack.
By default, the Push-Location cmdlet pushes the current location onto the current location stack, but you can use the StackName parameter to specify an alternate location stack. If the stack does not exist, Push-Location creates it.
So instead typing Set-Location we can hold location we visit frequently and switch there without remembering or typing long command string.
Creating Files with New-Item (ni)
Using New-Item command we can create new item of any type like text file, .sql, .xls
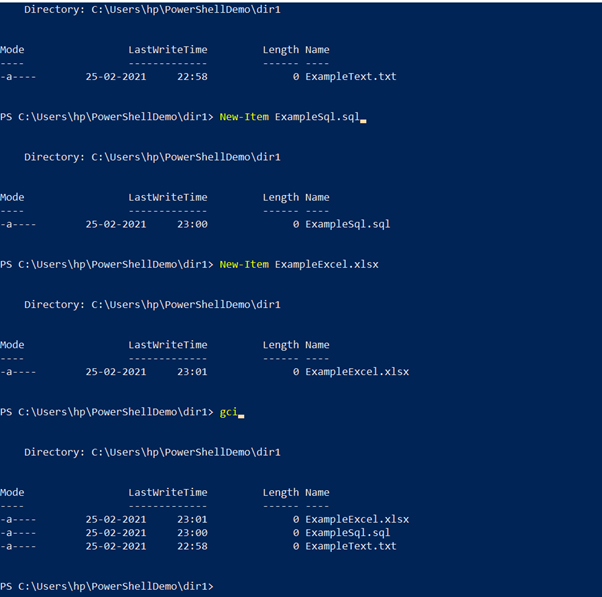
We can also create multiple files together using ni example1.txt,example2.txt
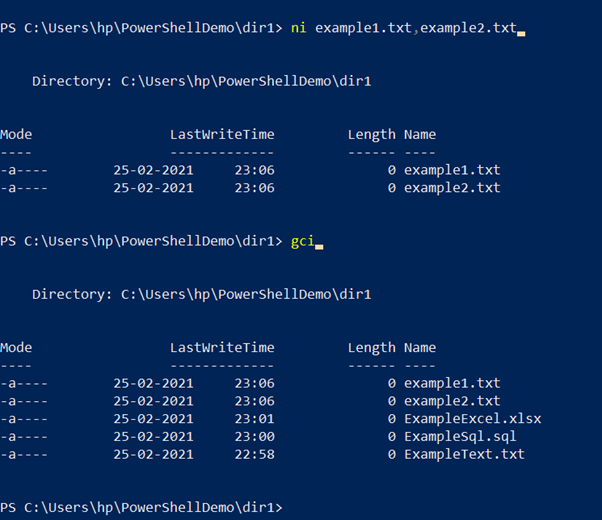
Copying and Moving Files with Copy-Item (cp) and Move-Item (mv)
We can move and copy files we created between directories using Copy-Item (cp) and Move-Item (mv)
Copy-Item example1.txt ..\dir2\
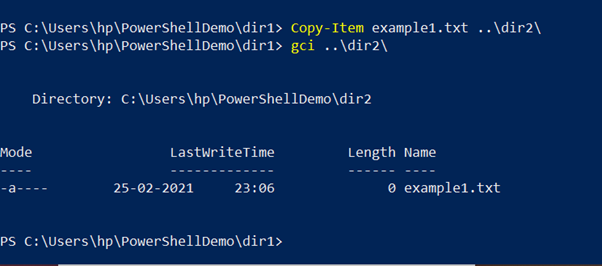
We can move files using Move-Item to move files between directories. We can also rename using same command as shown in below image.
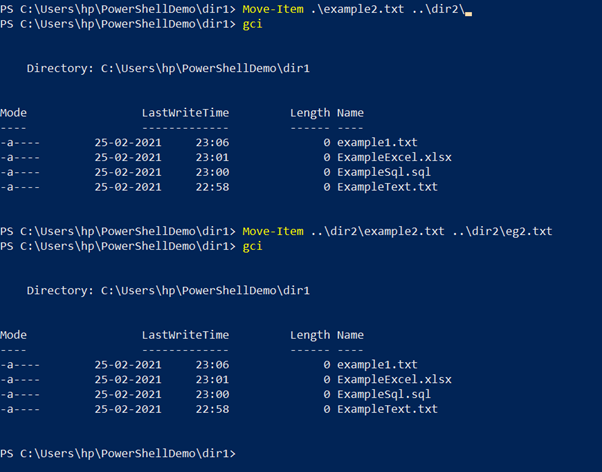
Writing to Files with Write-Output (write, echo) and Redirection
We have an empty file in our dir directory. That’s not very interesting. Let’s add some content. We could open the file in Notepad and modify it that way. But we can also add to it with commands right from the command line. The cmdlet we use for this is Write-Output, or just write.
Try entering this:
write "The technique of reproduction detaches the reproduced
object from the domain of tradition."
PowerShell should print that statement directly into the command-line window. That’s all that write does. It tells PowerShell “Print out whatever I write.” That’s not very useful, though, because we want it to put this text into our document. To do this, we’ll use something called redirection.
Redirection is just a way to tell PowerShell to take the results of a command and put them somewhere other than in the PowerShell window. To redirect a command, we put a right angle bracket (>) between the command and the place we want its output to go. In this case, we want the output of our write command to wind up in example1.txt. So we use the up arrow to get the statement back, and add > example1.txt at the end. The whole thing should look like this:
write "The technique of reproduction detaches the reproduced
object from the domain of tradition." > example1.txt
Reading Files with Get-Content (gc, cat)
While gci can show us that something is in the file, it would be nice to see that it’s the sentence we tried to put in there. We could do this by typing notepad example1.txt, which would open the document in Notepad. But there is also a cmdlet for just printing the contents to PowerShell. This cmdlet is called Get-Content. Enter:
gc example1.txt
There’s your sentence!
Using gc by itself is helpful, but not that interesting. By combining it with redirection, we can do a lot more. For starters, we can put the contents of one file into another. This is a lot like copying a file. You already know how to do this with cp. Make a copy of example1.txt named eg2.txt using cp. That command will look like this:
cp example1.txt eg2.txt
Now, try to make example12.txt, with the exact same contents as example1.txt but by using gc and redirection. See if you can figure out how to do this.
In case you’re stumped, here’s the answer:
gc example1.txt > example12.txt
Searching with Select-String (sls)
Of course, we don’t always want to see everything. Often, we want to find specific content. Using *, we can search multiple files at the same time. One of our sentences had something about “unique existence,” didn’t it? Where was that? We can use the Select-String cmdlet to search for specific bits of text. Enter
sls "unique existence" *.txt
and PowerShell will spit out all the lines containing that string from any file in our directory ending in .txt.
Using sls on files as small as ours won’t save us all that much time over reading the files ourselves. But using this cmdlet with larger numbers of longer files can be extraordinarily helpful.
Finding out more with Get-Help
PowerShell does not expect you to memorize all the possible parameters for all the cmdlets. Instead, it provides an easy way to list them off using the cmdlet Get-Help. Enter
Get-Help gc
and you’ll get a screen that looks like this:
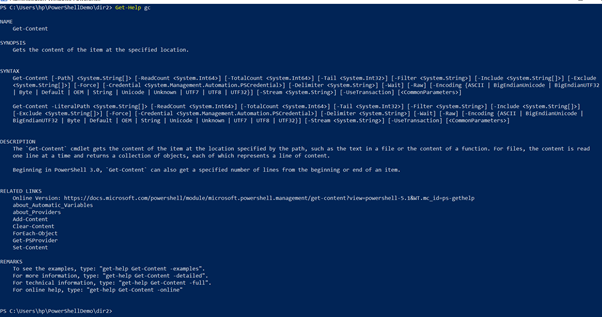
Your page may be slightly different, but the important part to look at right now is the section labeled “SYNTAX.” This shows us all of the parameters we can add to Get-Content. If you’re just trying to remember the exact name of a parameter you’ve used before, this will be enough to jog your memory. But it doesn’t tell us what the parameters actually do.
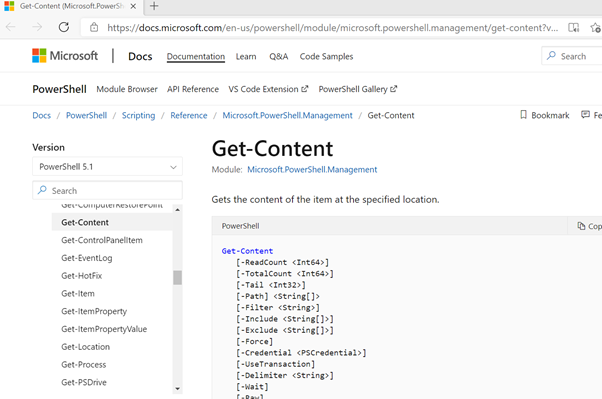
Fortunately, Get-Help itself has parameters, and by adding -online to your Get-Help cmdlet, you tell PowerShell to ask your browser to open a page on Microsoft’s TechNet portal that explains all the parameters
Get-Help gc -online
Quick Reference
This table serves as a quick reference to all the cmdlets discussed in this lesson. The first column shows the actual name; the second shows what you will normally type instead. The Bash equivalent shows the most similar command in Bash. Unless this command is in parentheses, it can also be used in PowerShell as an alias for the corresponding cmdlet. (Linux and OS X users, please see the note below.) For a more complete explanation of any of the cmdlets, use Get-Help with the -online parameter (e.g. Get-Help Get-ChildItem -online.)
|
Cmdlet |
Alias |
Bash Equivalent |
Description |
|
Get-ChildItem |
gci |
ls |
List the directories and files in the current location. |
|
Set-Location |
sl |
cd |
Change to the directory at the given path. Typing .. rather than a path will move up one directory. |
|
Push-Location |
pushd |
pushd |
Changes to the directory. |
|
Pop-Location |
popd |
popd |
Changes back to the previous directory after using pushd |
|
New-Item |
ni |
(touch) |
Creates a new item. Used with no parameter, the item is by default a file. Using mkdir is a shortcut for including the parameter -ItemType dir. |
|
mkdir |
none |
mkdir |
Creates a new directory. (See New-Item.) |
|
Explorer |
none |
(open) |
Open something using File Explorer (the GUI) |
|
Remove-Item |
rm |
rm |
Deletes something. Permanently! |
|
Move-Item |
mv |
mv |
Moves something. Takes two arguments - first a filename (i.e. its present path), then a path for its new location (including the name it should have there). By not changing the path, it can be used to rename files. |
|
Copy-Item |
cp |
cp |
Copies a file to a new location. Takes same arguments as move, but keeps the original file in its location. |
|
Write-Output |
write |
echo |
Outputs whatever you type. Use redirection to output to a file. Redirection with >> will add to the file, rather than overwriting contents. |
|
Get-Content |
gc |
cat |
Gets the contents of a file and prints it to the screen. Adding the parameter -TotalCount followed by a number x prints only the first x lines. Adding the parameter -Tail followed by a number x prints only the final x lines. |
|
Select-String |
sls |
(grep) |
Searches for specific content. |
|
Measure-Object |
measure |
(wc) |
Gets statistical information about an object. Use Get-Content and pipe the output to Measure-Object with the parameters -line, -word, and -character to get word count information. |
|
> |
none |
> |
Redirection. Puts the output of the command to the left of > into a file to the right of >. |
|
| |
none |
| |
Piping. Takes the output of the command to the left and uses it as the input for the command to the right. |
|
Get-Help |
none |
man |
Gets the help file for a cmdlet. Adding the parameter -online opens the help page on TechNet. |
|
exit |
none |
exit |
Exits PowerShell |

